Library Catalog Kiosk Stations, Free with Linux (Part 4) - Create Kiosk Script & Set Up Custom Session
Phil Neilson
•
28 August 2025
•
12 mins

Posts in this Series:
- Library Catalog Kiosk Stations, Free with Linux (Part 1)
- Library Catalog Kiosk Stations, Free with Linux (Part 2) - Install the OS
- Library Catalog Kiosk Stations, Free with Linux (Part 3) - Install and Configure Utilities
- Library Catalog Kiosk Stations, Free with Linux (Part 4) - Create Kiosk Script & Custom Session
A shell script is a simple text file containing a list of commands that you’d normally type into your computer’s command line (the terminal). Instead of typing them one by one, you can save them all in a single file and run the file to execute all the commands in order. “Bash” is the scripting language that is commonly used to give the commands in the terminal. In this post, we’ll create a master Kiosk Manager shell script that will bring all of the programs and utilities that we installed in Part 3 together. We will also create a custom desktop session optimized for our kiosk station.
Step 1: Create a Kiosk Manager Script
First, we will create a set of instructions that will open the Chromium browser, connect via our Squid proxy server to our library catalog’s homepage, listen for keystrokes so that if someone hits the “start over” button (F11) it will return to the homebage, and monitor the session for inactivity and restart back to the homepage if the session is inactive. One other feature that this script will accomplish is that if someone closes the Chromium window (for example, through a key command such as ctrl + w), it will simply restart Chromium back at the homepage again.
Open a terminal window with ctrl + alt + T, then enter the following command to create a new text file in your home directory:
xed kiosk-manager.sh
This command will create a new text file named kiosk-manager.sh and open it in the xed text editor. You do not need sudo privileges for this file, because you are creating it in your home directory, rather than a systemwide directory. Once again, you’ll probably get a warning at the bottom of the screen saying that the file does not exist, but that is okay; it will exist once you save it.
Now, copy and paste the following code into your new file:
#!/bin/bash

# The URL to reset to
HOMEPAGE="https://ofpl.tlcdelivers.com"

# The inactivity timeout in seconds (30 seconds in this case)
TIMEOUT=30

# The name of the web browser executable
BROWSER_EXEC="chromium"

# Create a temporary directory for the kiosk user profile
KIOSK_PROFILE_DIR="/tmp/kiosk-profile"
mkdir -p "$KIOSK_PROFILE_DIR"

# The full command to launch the browser in kiosk mode
BROWSER_COMMAND="$BROWSER_EXEC --kiosk --no-sandbox --user-data-dir=$KIOSK_PROFILE_DIR $HOMEPAGE"

# Function to reset the browser
reset_browser() {
    echo "Inactivity detected. Resetting browser..."

    # Kill all running instances of the browser
    pkill -f "$BROWSER_EXEC"

    # Wait a moment for it to close completely
    sleep 2

    # Restart the browser with the homepage URL
    $BROWSER_COMMAND &

    # IMPORTANT: Reset the X server idle timer by simulating a mouse movement
    xdotool mousemove 1 1
}

# Start xbindkeys in the background so it can listen for key presses
xbindkeys &

# The main loop that monitors for inactivity and checks if the browser is running
while true; do
    # Check if the browser process is running
    pgrep -f "$BROWSER_EXEC" > /dev/null

    # If the browser is NOT running, restart it
    if [ $? -ne 0 ]; then
        echo "Browser process is not running. Restarting..."
        $BROWSER_COMMAND &
    fi

    # Get the time of the last user activity from the X server
    LAST_ACTIVITY=$(xprintidle)

    # Convert milliseconds to seconds
    LAST_ACTIVITY_SECONDS=$((LAST_ACTIVITY / 1000))

    # Check if inactivity exceeds the timeout
    if (( LAST_ACTIVITY_SECONDS > TIMEOUT )); then
        reset_browser
    fi

    # Wait for 1 second before checking again to avoid high CPU usage
    sleep 1
done
Before you save and close, look at line 4 of the code, HOMEPAGE=”https://ofpl.tlcdelivers.com”. Replace the URL that is in quotation marks with the URL for your own catalog homepage.
Also check line 10, BROWSER_EXEC=”chromium”, and replace the command in quotation marks with your browser of choice, if you are using a browser other than Chromium.
Lastly, check line 27, sleep 2. This command creates a gap between when the browser closes, either by someone hitting the home key F11 or another key combination like ctrl + W or by timeout, and opening the browser back up again. It is intended to make sure the browser process is fully stopped before starting another one. However, that is very conservative and will mean that there is a noticeable black-screen pause for the user when the process resets. You can experiment with this, but I found you can make that value as low as 0.5 without problems, which is visually a much smoother reset transition.
When you are happy with the code, save with ctrl + S, and then you can close the text editor.
Lastly, we need to make this script you just created executable. In the terminal, enter the following command:
chmod +x kiosk-manager.sh
You shouldn’t get any reply back from the terminal if this operation is successful, but now you just gave permission for this file to be executed as a script.
Step 2: Create a Custom Xsession
We are getting very close to having a working kiosk station! The last thing that we will do is create a custom Xsession that will load only the Chromium browser upon login, rather than loading and running the Cinnamon desktop in the background.
To do this, we’ll create another script in our home directory. Open a terminal with ctrl + alt + T and enter the following command:
xed kiosk-session.sh
Again, the text editor will open (don’t worry about the warning at the bottom!). Paste the following code in the document:
#!/bin/bash

# Start the kiosk manager script
/home/catadmin/kiosk-manager.sh

# After the kiosk script is terminated, shut down the X session
exit 0
Even though shell scripting might seem intimidating (especially looking at the first one we made), it’s pretty easy to see what’s going on in this one. It simply runs the Kiosk Manager script that we created in the last step, and then tells the session to end once that script is terminated. All of the lines beginning with # are just comments explaining what the commands are doing.
One thing to note. When you installed Linux, if the user you created is something different from catadmin, you’ll need to alter the username in the file path /home/username/kioskmanager.sh.
Save the file with ctrl + S, then exit the editor. Make this script executable, just like we did with our first script, with the following command:
chmod +x kiosk-session.sh
Now we will create one more file in our xsessions folder that will define this custom session. To do this, we first need to navigate to our xessions directory. In the terminal, enter the following command:
cd /usr/share/xsessions
The “cd” command means “change directory”. It is the command-line equivalent of clicking into folders and subfolders in a graphical file explorer. You should see the path of the location we navigated to (/usr/share/xsessions) appear in green in the terminal. Now we can create our new xsession file. Enter the following command:
sudo xed kiosk.desktop
This time, you’ll be asked for your password because you are using sudo. This is necessary because we’re creating this file in a systemwide directory. Type in your password and press enter, and the text editor will once again open (and once again, ignore the warning at the bottom). Copy and paste in the following code:
[Desktop Entry]
Name=Kiosk Browser
Comment=Launches the web browser in full-screen kiosk mode
Exec=/home/catadmin/kiosk-session.sh
Type=Application
Again, note that in the line beginning with EXEC=, if your user is different than catadmin, you’ll have to change it to your username. Save with ctrl + S and exit the text editor.
Your custom Xsession should now be all set up.
Step 3: Set Power Button to Shut Down Computer
One final step before testing your work. If your library procedures are like mine, library staff shut down the computers at the end of the day. It is very useful for staff to be able to press one button to boot the computer, and also one button to shut it down.
We have already set our user account to log in automatically during the Linux Mint installation process. However, if you didn’t you’ll need to set that by clicking the main menu icon, typing “Login window”, opening the Login Window dialog box and choosing “Users”, and then in the automatic login field, entering your computer’s username.
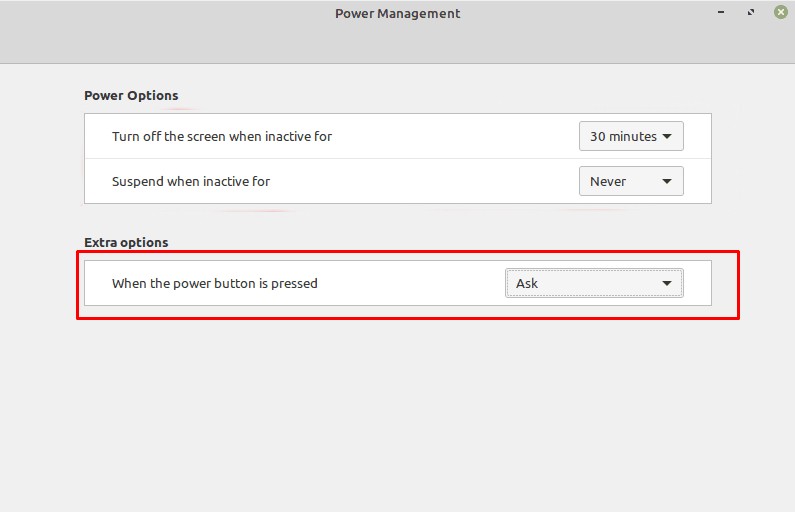
Now we need to tell the computer to shut down automatically when the power button is pressed. To do this, click on the main menu icon, type “Power Manager”, and open the Power manager dialog box. From there, look for the option When the power button is pressed and in the dropdown menu change it from “Ask” to “Shut Down Immediately”.

Depending on your system, you may also want to set some of the other options such as “Turn off the screen when inactive for” to Never, so that your catalog kiosk station doesn’t go to sleep or turn off its display.
Step 4: Test It Out
Now, log out by clicking the main menu icon in the lower left, then clicking the “logout” button (it is the button right above the red “shutdown” button and looks like the shutdown button turned on its side).
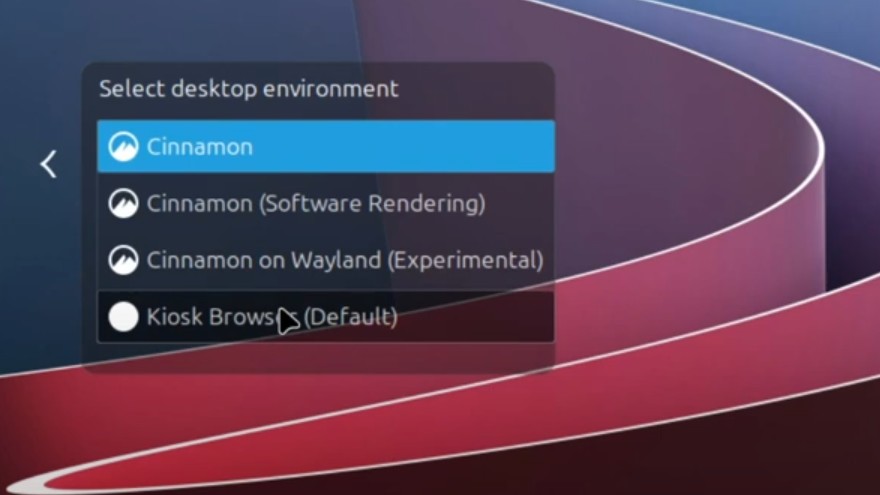
This will take you back to the user login screen. You should see the user that you created when you installed Linux Mint, and to the right of it, you should see a small round icon that looks like a circle with a mountain in it. If you click on that icon, you should see a few options, but one of the options should be the custom session that we created in the last step. It will be called “Kiosk Browser”, and it will have a solid circle beside it.

Click that option, and then enter your password. If the scripts that we created in this post are working correctly, your browser should launch to your catalog’s homepage. You did it!
Exiting the Custom Session
Now that you’re in your locked-down custom session, there is no apparent way to get out of it! If everything is working correctly, anything you might try to do to close the browser will just result in it resetting back to the homepage. Even shutting the computer down and rebooting it should automatically boot right into this xsession if you have set the automatic login correctly. This is great, beacuse it means you have a locked down session. But how can you make any needed changes or run updates?
To make changes to your catalog kiosk station, you can open a virtual console (also called TTY or teletype) by pressing ctrl + alt + F1. When you do this, you will be prompted for your username; type it and press “enter”. Next you’ll be prompted for your password; type it and press “enter”. Now, you’ll be logged into your user account within this virtual console and should be able to give the system commands. To end this Xsession, enter the following command:
pkill -f kiosk-manager.sh
This command will force the kiosk-manager.sh script to stop. If you recall from our kiosk-session.sh script above, we told it to shut down the Xsession when the Kiosk Manager script is stopped. You should be returned to the Mint login page. To log back into your regular system, click the circle icon to the right of your username to open the desktop sessions menu, and then choose “Cinnamon” again. Enter your password, and you’ll be logged back into the regular desktop, able to update your system or make any necessary changes.
Your most recently selected desktop selection will be loaded upon startup, so once you are done making any changes, be sure to log out, select your “Kiosk Broswer” custom session, and enter your password to log in again. Now when you shut down your computer and reboot, it will boot into your custom catalog kiosk session.
Conclusion
In this series of posts, we have:
- Downloaded a Linux Mint ISO
- Written it to a bootable USB
- Installed Linux Mint
- Installed Chromium
- Installed and configured a bunch of supporting utilities
- Created a custom kiosk manager script
- Created a custom Xsession that loads just the browser
In doing so, we have created a free, reliable, locked-down kiosk station that can be powered on in the morning with a single button push, used by patrons throughout the day to access your library’s catalog, and shutdown in the evening with a single button push.
If you are a librarian who has been following along with these instructions, I hope that you’ve enjoyed this learning process and are interested in exploring Linux further. If you are trying to use these instructions to implement a catalog kiosk station in your library and run into issues, feel free to reach out to me!
Like it? Share it!