MakerSpace Program - Laser Engraved Acrylic Necklaces
Phil Neilson
•
3 September 2025
•
9 mins
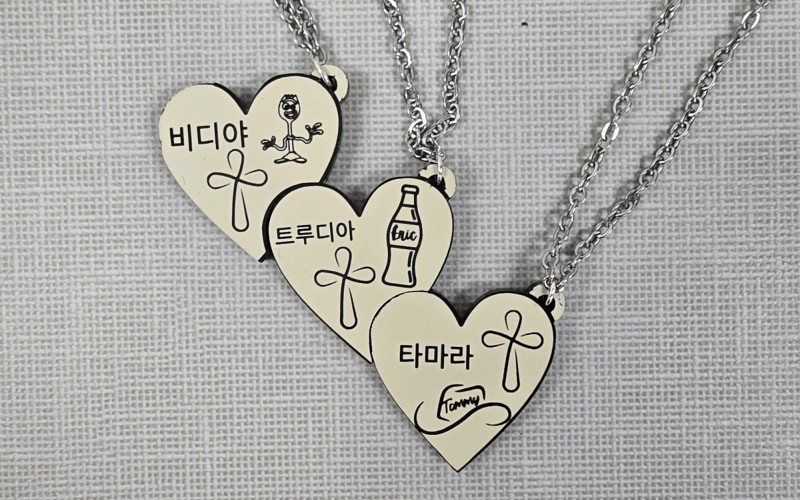
A couple Saturdays ago, we hosted a “Sisters Necklace” workshop in our library Makerspace. The aim of the workshop was to introduce people to the MakerSpace’s Xtool S1 laser cutter/engraver by having them create friendship necklaces. Megan, one of our library clerks who is very creative and knowledgeable about our MakerSpace equipment, devised and planned this activity, and I assisted her with the technical details.
Here is how we structured the program.
Materials Used
- 3mm two-tone acrylic sheet (we used this)
- 24in necklace chains (we used these)
- Jump rings (such as these)
- Xtool S1 laser engraver with 40w laser module
We purchased two different two-tone acrylic sheets for this program, thinking that we would offer participants a color choice. We got the black/almond sheet listed above and a white/black sheet. In our pre-program testing, however, we discovered that the engraver did not cut the white acrylic very well. With high enough power or enough passes we could cut through it, but the cut wasn’t clean looking. This is because the blue light from the diode laser in our machine is largely reflected by the white color, which then didn’t generate sufficient heat for a good cut. Diode laser engravers aren’t great for cutting acrylic, it turns out. However, it seems to do the best with black, so if you decide to do a project that involves cutting acrylic with a diode laser, I’d recommend choosing black as a base color. (The top color doesn’t seem to matter.)
Also, the jump rings that came with the necklace chains that we ordered were way too small to fit through a hole in our 3mm acrylic, so just be warned. We had some spares that we used, but I linked to an assorted set above that should have some that are the right size.
Software Used
- Canva
- Inkscape
- Xtool Creative Space
For the main design portion of the program, we had partipants use Canva. There are two reasons this was a good option for us. First, Canva has a really easy to use interface that people intuitively know how to use. Second, we were able to log all the computers that participants were using into our MakerSpace Canva account, so all the designs were stored in our account, which made file transfer easy; we didn’t need to email or use a USB to transfer the participants’ designs to the computer that was running the Xtool. Since our participants working in pairs, this solution worked; however, I believe that there may be a limit to the number of concurred users for a Canva account (perhaps 10, but I haven’t confirmed this), so this solution might not work in every situation.
We used Inkscape to covert the PNG designs that participants created into SVG files.
Finally, we uploaded the SVGs to Xtool Creative Space to make the actual cuts/engravings with the machine.
Step 1 - Creating the Design in Canva
We began in the computer lab. First, Megan welcomed participants to the program and showed a slide deck with some example sister/friendship necklace designs that fit together.
We then had the pairs of participants begin to brainstorm and design the outer shape of their necklaces in Canva. Finally, they added content such as images and text to the inside of their chosen shapes in the same Canva design. We made sure to emphasize the imporance of selecting the right images (simple line art, two tone images) for engraving, as we have had programs in the past where people chose images with very complex colors for engraving, which didn’t come out as they hoped.

Step 2 - Process the Image in Inkscape
As pairs finished their designs, they made their way over to MakerSpace where I was stationed at the laser engraver. I downloaded their design from our MakerSpace’s Canva account as a PNG image and then opened the image in Inkscape.
If you haven’t ever used Inkscape before, I can’t recommend it highly enough for a huge range of Makerspace applications. It’s a free, open-source vector editor, and it is very powerful. I only know a handful of the many things you can do with it. The “trace bitmap” feature alone makes it incredibly useful for all manner of cutting projects where you need path-based images.
Most applications that come with a piece of cutting equipment (such as a Cricut cutter or our Xtool laser engraver) have built-in editors that allow you to do quite a lot, so it may seem a bit counterintuitive to add Inkscape into the mix when we could achieve the same thing without it. My argument for learning Inkscape is:
- 1) You have total control over your image; you won’t run into something you can’t achieve due to the limitations of the built-in editing features in the proprietary editor; and
- 2) You can spend a lot of time learning the different interfaces of Cricut Design Space, Xtool Creative Space, and all the other programs that come with your equipment, or you can learn Inkscape and use it for everything.
Here is the process I followed in Inkscape.
1. Trace Bitmap Open the downloaded PNG image (File > Open), and once it is loaded click on it to select it. Now open the Trace Bitmap tool (Path > Trace Bitmap) and adjust the threshold until it is picking up all of your design, then click “Apply”. Open the Layers and Objects menu (Layers > Objects and Layers) and you should see both your original image and the new path that was created by the bitmap trace. Click on the eye icon to hide the original image layer. Lastly, export your new path (File > Export > in the panel choose “Selection” at the top > change the file type to “Plain SVG” > give your SVG a name > Export).

2. Break Paths
We have just created the image that will be engraved onto the surface of the necklace, but now we also need to create a path for the engraver to cut out the necklace’s shape. To do this, we first need to isolate the outer edge of our current path. Ensuring that your path is still selected, break apart its components (Path > Break Apart). You’ll now see a whole bunch of paths listed in your Objects and Layers menu, but the top path listed should be the outline. Holding down the “Shift” key, select the second path and then scroll all the way down to the bottom of the list and select the bottom path, then right-click and choose “Delete”. Now your path is just the outline of your shape.

3. Dynamic Offset
It’s a good idea to have your outer cut path be a bit bigger than the image that you are engraving. To add that extra bit of margin, use the Dynamic Offset tool. In the Objects and Layers panel, right click on your path and choose “Duplicate”, then click on the new path that was created (the bottom one). Give that bottom path a new color by choosing a color from the menu at the bottom; you won’t see the shape change color yet, but it will help you be able to see your offset.
Next, choose the Dynamic Offset tool (Path > Dynamic Offset). You should see a little diamond shape appear at the top of your path–if you don’t see it, double check to make sure that you have the node tool selected in the left tool menu. Click and hold on the diamond shape and slowly drag upwards and you should see your bottom (new colored) shape enlarging. Once you have your new offset path the size that you want it, go back to the Objects and Layers menu and delete the old (top) path. Lastly, making sure your new Dynamic Offset object is selected, turn it back into a path (Path > Object to Path).

4. Adding Holes and Combining Paths
The last thing I wanted for this project was some holes for the jump rings. To add these, create a new circle shape from the tool menu on the left side (if desired, make the fill of your circle transparent using the fill/stroke menu at the bottom). Then copy-paste the circle shape and place the circles according to where they would be needed in the design. Last, in the Objects and Layers menu, hold down “ctrl” and select all of the paths (make sure you avoid the original image layer) of your outer shape and the circles, and then combine these paths into one path (Path > Combine). Lastly, export your cut path (File > Export > in the panel choose “Selection” at the top > change the file type to “Plain SVG” > give your SVG a name > Export).
Note: I still haven’t created the cut paths to cut the shape into the four pieces that it will eventually be in. We could definitely achieve this in Inkscape, but for the sake of this project, I found it easier to add the straight line cut paths in the Xtool Creative Space.

Step 3 - Engraving and Cutting
Like it? Share it!