Library Catalog Kiosk Stations, Free with Linux (Part 3) - Install and Configure Utilities
Phil Neilson
•
25 August 2025
•
11 mins

Posts in this Series:
- Library Catalog Kiosk Stations, Free with Linux (Part 1)
- Library Catalog Kiosk Stations, Free with Linux (Part 2) - Install the OS
- Library Catalog Kiosk Stations, Free with Linux (Part 3) - Install and Configure Utilities
- Library Catalog Kiosk Stations, Free with Linux (Part 4) - Create Kiosk Script & Custom Session
Now that you have a fresh installation of Linux Mint on your catalog computer kiosk station, you’re ready to configure the kiosk session to run in a browser automatically when the computer is booted. In this post, we’ll be going through the installation and setup of a browser and a few utilities that will help us meet the requirements for the kiosk station outlined in part 1.
A note about these instructions. On Linux (as in most computing) there are two ways to get something done: with the command line in a terminal, or with the graphical interface. Some things are easier to do one way than the other. Experienced Linux users and adminsitrators tend to prefer the command line because often you can accomplish tasks with a terse command that would take lots of clicking through menus or folders if you went the graphical route. As a Linux hobbyist who is very much still learning, I have found that there are some things that are easier for me to accomplish with the command line, and some things that just make more sense to me when I use the graphical interface. So in these instructions, I am going to use a mix based on what felt more comfortable for me.
Step 1: Install Chromium Browser
Out of the box, Linux Mint 22.1 Cinnamon comes with Firefox preinstalled, and it would be a fine browser to use for this project. But I ended up installing and using Chromium, which is readily available.
To install Chromium, first run a system update to make sure your system is up to date. To do this, open up a terminal by pressing ctrl + alt + T. Now enter the following command:
sudo apt update && sudo apt upgrade
After you hit enter, you’ll be asked for your password. This is because you used “sudo” (short for superuser do) at the beginning of your command to run the command as the administrator, which is necessary to modify systemwide software.
The first half of this command will refresh your package list, and the second half will automatically download and install any updated versions of the packages found, ensuring that your system is up to date. It’s always a good idea to run this command before installing new software.
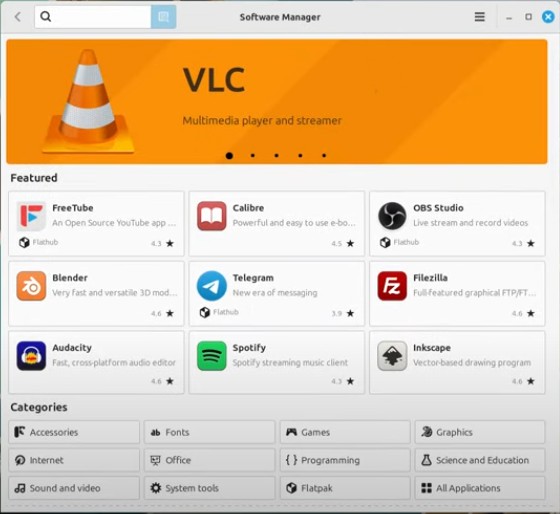
Once the update is complete you can proceed with installing Chromium. For this step, I used the graphical interface. Click on the main menu icon in the lower left hand corner of the screen and select “Software Manager” (if you don’t see it, you can search for it with the menu’s built-in search bar).

Once the Software Manager opens, search for Chromium in the search bar. Once you’ve found it, select it and click Install. If you get an error message telling you that it isn’t able to install Chromium, open up a terminal and run the update command again, then reopen the Sotware Manager and try again.
Step 2: Install Additional Utilities
Besides Chromium, you will need to install a few additional packages that will give your kiosk the funcitonalities we’re looking for. Most browsers, including Chromium, have a built-in kiosk mode that will force full screen, but for a truly locked-down public kiosk, there are a few features that we’ll need to add.
Open a terminal and enter the following command:
sudo apt update
Enter your password and hit “enter”. Once the update finishes, enter this command (to copy and paste within the terminal, you’ll need to add shift to the regular keyboard commands; if you want to copy and paste the below command, you’ll have to hit ctrl + shift + V in the terminal):
sudo apt install squid xprintidle xdotool xbindkeys
This command will install the following programs:
- squid is a proxy server that will stand between our browser and the regular web. We will use squid to set a list of whitelisted URLs that it will allow the user to access, while denying all other URL requests.
- xpintidle is a tool that measures how long it has been since the last user input. We will use this to tell the computer to refresh back to the home screen if the catalog station sits idle so that each user can start from the beginning rather than from wherever the last user left it.
- xdotool is a tool that allows you to simulate mouse and keyboard movements. We need this to work with xprintidle to make the refresh script work. Essentially, if the computer sits idle and hits the refresh point, after the refresh xdotool will make a tiny movement of the mouse to reset the xprintidle counter. Otherwise, your script would just continually be refreshing without waiting for the defined idle period.
- xbindkeys is a tool that allows you to define custom keyboard commands. We will be using this tool to create a “start over” button for the user so that they can get back to the start of the catalog even without the browser’s navigation bar.
A note about this and other commands you will run in the terminal later in this process: you may run into error messages. When you are new to using the command line, an error message can feel like an insurmountable hurdle. Even just parsing the error message can sometimes be tricky. I have learned that copying your command and its error output (ctrl + shift + C) and pasting it in a chat based AI service can work wonders. I’m not saying that AI is infallible or that you should blindly trust it, but I’ve found it to be remarkably good at explaining to me what the error is and what I can do to fix it (often, just running another command, or sometimes installing another program that the one you are installing depends on). The point is, don’t panic if you get an error message–it is probably solvable, and with a fairly few number of steps!
Step 3: Configure Squid
We have to tell Squid which URLs we want to allow the kiosk system to access.
To create our whitelist, we’ll create a configuration file within Squid’s directory (folder) that gives it these instructions.
To do this, we’ll first open a terminal and navigate to the correct Squid directory where we need to place this configuration file. Open a terminal again and then enter the following command:
cd /etc/squid/conf.d
You should see /etc/squid/conf.d now appear in green. Enter this command to create a new text file in this folder:
sudo xed kiosk_whitelist.conf
You’ll be asked for your password since you are using administrative privileges (sudo) to create this file. Once you input it and hit enter, a blank text editor will open up. You may see a warning at the bottom saying “file doesn’t exist” but don’t worry, it will when we’re done! Now, copy and paste the following instructions into this text file:
#
# Custom rules for the library kiosk whitelist
#
acl allowed_domains dstdomain .ofpl.tlcdelivers.com
acl allowed_domains dstdomain .kanopy.com
acl allowed_domains dstdomain .overdrive.com
acl allowed_domains dstdomain .librarything.com
acl allowed_domains dstdomain .syndetics.com
acl allowed_domains dstdomain .docs.google.com
acl allowed_domains dstdomain .forms.gle
acl allowed_domains dstdomain .od-cdn.com
acl allowed_domains dstdomain .googleapis.com
acl allowed_domains dstdomain .mountain.com

# Allow access to the whitelisted domains
http_access allow allowed_domains

# Deny everything else
http_access deny all
We’re not done yet! These instructions contain a the whitelisted URLs for my library’s catalog to run correctly, but not yours! In each line that begins act allowed_domains dstdomain, you’ll need to replace the URLs with your own catalog’s URLs. You may have to add or delete some lines.
Our library catalog’s main URL is http://www.ofpl.tlcdelivers.com/, so the .ofpl.tlcdelivers.com tells it to allow any sites in that domain. Our catalog has records for our electronic resources like evideos (Kanopy) and ebooks and eaudiobooks (Overdrive) that link to those external services. I wanted people using the catalog kiosk station to be able to explore these resources, so I whitelisted their URLs as well. On our catalog home page, we also have a link to a Google Form people can use to request technology help, and in order to allow access to that form, I included the URLs that form might use as well.
The remaining URLs in the list were the tricky ones that took some trial and error, and may for you as well. When I loaded the kiosk browser to test it out, I noticed that the new title image carousel that usually displays on our catalog’s home page wasn’t working. It turns out that for the kiosk to work, it has to pull data from librarything.com and syndetics.com in order to work. Also, I noticed that in the Overdrive web app, book records were not displaying correctly in the browser, and it turned out that site pulls data from od-cdn.com. You can discover the URLs needed by opening the page that isn’t working right with a normal (non-kiosk) browser and then opening the developer tools, going to the network tab, and refreshing the page. You’ll see a list of things that the page has to load in order to work. If you right click on that list, a menu will pop up: select copy > copy all URLs. Paste that into a text editor and you’ll be able to scroll through and see the domains that your page needs access to in order to load correctly. Add those to your whitelist.
After you have edited the list of URLs to reflect your catalog’s custom URL needs, it s very important to save this file (ctrl + S). Then you can exit the text editor. Lastly, in your terminal, run the following command:
sudo systemctl enable --now squid
Enter your password, and press “enter”. You should get a message telling you Squid started successfully. Squid should now be configured with your custom URL whitelist.
Step 4: Configure xbindkeys
The last configuration that we need to make to our utilities is to tell our xbindkeys utility to restart the kiosk station back to its home page (ie. the start page of your catalog) when you press a given button. In my library’s case, this is important because if a user views ebook resource on the external Overdrive site, they have no way to get back to the catalog becuase there will be on navigation bar. So we’ll use xbindkeys to create our own custom home key instead.
Again, open a terminal window, then enter the following command:
xed ~/.xbindkeysrc
And again, a blank text editor will open up. Paste the following code:
# Return to homepage
"pkill -f 'chromium'; /home/catadmin/kiosk-manager.sh"
    F11
Save with ctrl + S and exit the text file.
This file will make F11 your new “home” key. You can put a little sign on your computer station saying, “To start over, press F11” to help your users. You could change this to be a different key if you would like, just be sure it’s not a key the user would be using to type or navigate the catalog interface.
Right now, this configuration doesn’t make a lot of sense, because we haven’t yet created the kiosk-manager.sh script that this configuration file tells the computer to run once a person hits F11. Setting up that script and all final setup is what Part 4 is all about.
Like it? Share it!